Coding From Zero for Arduino
Learn how to code from zero knowledge about programming. This tutorial will guide you through the basics of programming for Arduino using C++.
Introduction
You are probably here because you want to learn how to code to enhance your engineering projects with some smart electronics. Arduino is a great platform to start with. It is easy to use and has a large community of users. In this tutorial, I will guide you through the basics of programming for Arduino using C++.
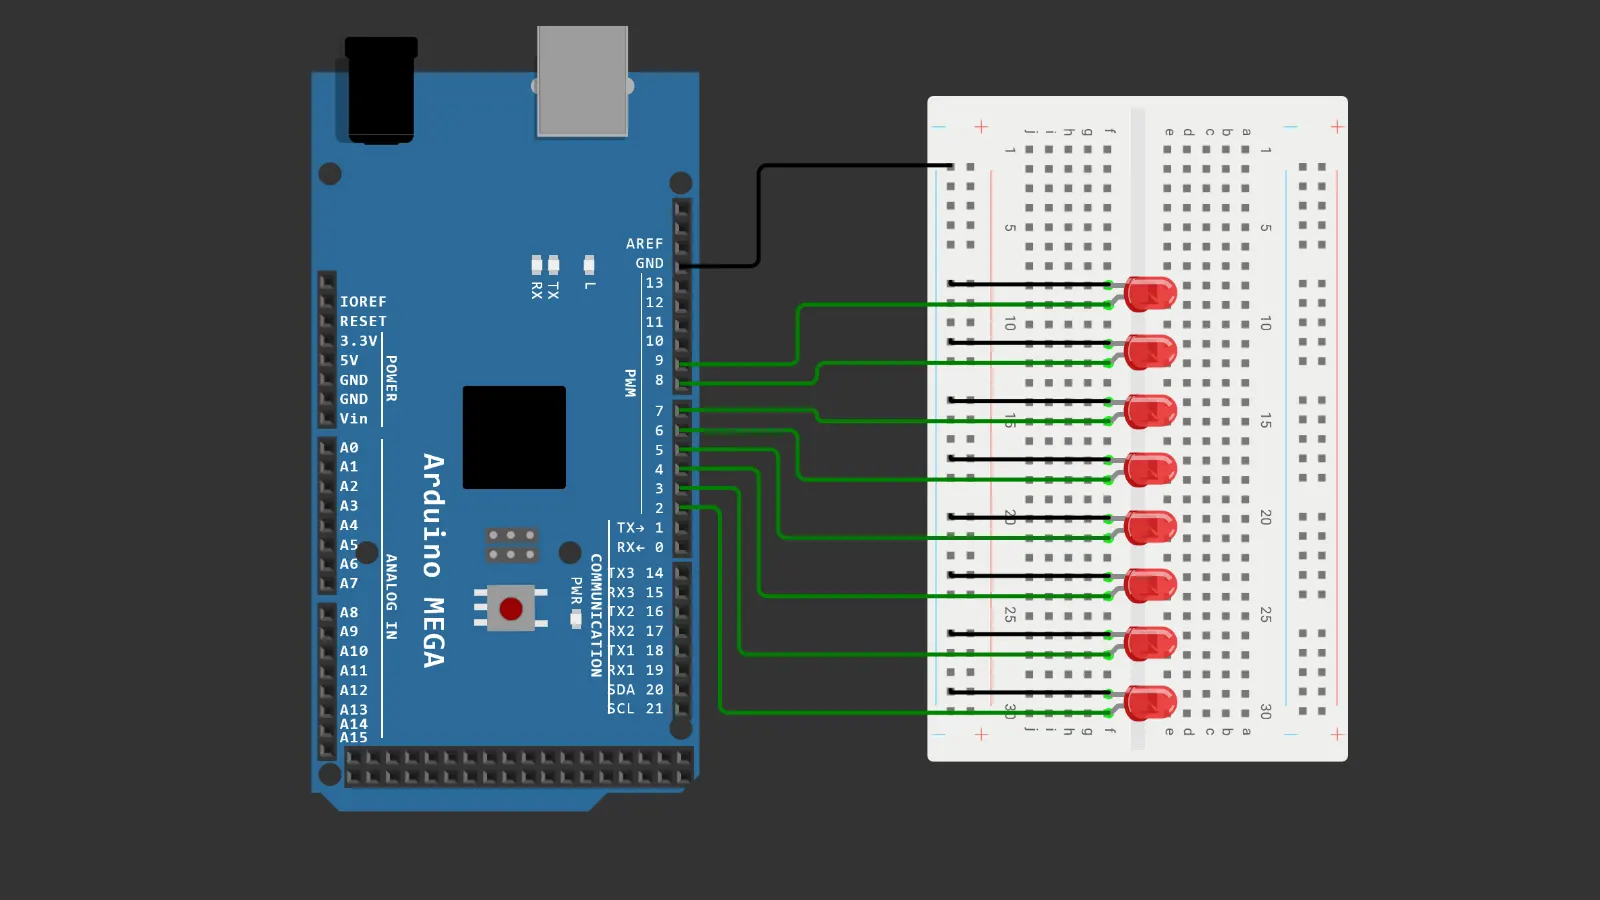
Below you see an interactive simulation of an Arduino board and 8 LEDs. The code is written in C++ and you can run it by pressing the green play button and see the result in the simulation in real time.
In this article I will try to provide you with all the necessary details to understand the code and the circuit above. This will be a good starting point for you to start coding for Arduino. I included a lot of interactive examples and simulations to help visualize the concepts.
Number Systems
Before we start coding, let’s look at some basics (that you probably already know) but are important to understand for programming in general.
How our Decimal System Works
First, let’s look at how we as humans represent numbers. We use the decimal system which is based on ten digits: $0 - 9$. When counting, we start with $0$ and go up to $9$. After that we add a new digit to the left and start over at $0$ again.
Take a simple decimal number, like $8253$. Each digit represents a value that’s a power of the system’s base (10 in this case).
| Example Digits | $8$ | $2$ | $5$ | $3$ |
|---|---|---|---|---|
| Place | $10^3$ | $10^2$ | $10^1$ | $10^0$ |
| Value | $1000$ | $100$ | $10$ | $1$ |
| Example Value | $8000$ | $200$ | $50$ | $3$ |
Adding these values together ($8000 + 200 + 50 + 3$) gives us the number $8253$.
Of course we humans intuitively understand this system, but it is impractical for computers to use it.
How the Binary System Works
You might have heard that computers only understand 1’s and 0’s. But what does that mean?
Computers are just very tiny electronic circuits that use voltages and currents to represent numbers and perform calculations.
The simplest way to represent a number is to use a high voltage (e.g. 5V) to represent a 1 and a low voltage (e.g. 0V) to represent a 0.
But how can we create complex programs using only 1’s and 0’s?
Well, it’s not as hard as you might think. Just like how we use the decimal system (based on ten digits: $0 - 9$) to build any number we want, computers use the binary system (based on two digits: $0$ and $1$). Both systems actually work in a similar way - you start at $0$ and go up to the highest digit, then add a new digit to the left and start over at $0$ again. Try it yourself if you don’t believe me:
But what do these 1’s and 0’s actually mean?
Similar to how in the decimal system each digit represents a value that’s a power of the system’s base (10), in the binary system each digit represents a value that’s a power of the system’s base (2). So instead of multiplying by $10$ when adding a new digit, we multiply by $2$.
| Example Digits | $1$ | $0$ | $0$ | $1$ | $0$ | $1$ | $1$ | $0$ |
|---|---|---|---|---|---|---|---|---|
| Place | $2^7$ | $2^6$ | $2^5$ | $2^4$ | $2^3$ | $2^2$ | $2^1$ | $2^0$ |
| Value | $128$ | $64$ | $32$ | $16$ | $8$ | $4$ | $2$ | $1$ |
| Example Value | $128$ | $0$ | $0$ | $16$ | $0$ | $4$ | $2$ | $0$ |
Adding these values together (in decimal): $128 + 0 + 0 + 16 + 0 + 4 + 2 + 0$ … gives us the number $150$.
As you can see, binary is just another way to represent numbers, not that different from our usual decimal system. Instead of powers of ten, binary simply uses powers of two—and that’s the “magic” language your Arduino and indeed all computers speak!
You may now realize why those LEDs blink the way they do in the simulation at the top.
The decimal counter is converted to binary and then each bit is used to turn on or off an LED.
In the binary system, each digit is called a bit. These bits are combined to form larger numbers and usually come in groups of 8, called a byte.
This is where the amount of storage or your internet speed’s units come from. A kilobyte is 1000 bytes, a megabyte is 1000 kilobytes, and so on.
When your internet speed is 100 Mbps, that’s 100 megabits (100 million one’s and zero’s) per second. To convert that to megabytes, you divide by 8, so 100 Mbps is 12.5 MB/s.
Some more info on the units:
- bits: 1 b
- bytes: 1 B (8 bits)
- kilobits: 1 Kb (1000 bits)
- kilobytes: 1 KB (1000 bytes = 8000 bits)
- kibiBytes: 1 KiB (1024 bytes = 8192 bits)
- megabits: 1 Mb (1000 Kb = 1,000,000 bits)
- megabytes: 1 MB (1000 KB = 8,000,000 bits)
- mebiBytes: 1 MiB (1024 KiB = 1,048,576 bytes = 8,388,608 bits)
… Gigabytes/Gibibytes, Terabytes/Tebibytes, and so on.
By the way, the difference between kilo and kibi is often why you see different numbers for storage sizes. E.g. you buy a 16GB USB stick, but your computer shows it as 14.9 GB because Windows technically uses the gibibyte (GiB) but displays it as gigabytes (GB).
The prefix
0bis often used to indicate that a number is in binary. E.g.0b1010is $8+2=10$.
Hexadecimal System
Binary numbers can get quite long and hard to read. To make it easier for humans to work with binary numbers, we often use the hexadecimal system.
In the hexadecimal system, we use 16 different digits: $0-9$ and $A-F$.
The reason why we use the hexadecimal system is that it is a power of 2 ($16=2^4$). This means that each digit in a hexadecimal number can be represented by 4 bits.
As you can see in the following example, the decimal number 255 takes up 8 bits in binary, but only 2 digits in hexadecimal:
Here, the prefix
0xis used to indicate that the following number is in hexadecimal. E.g.0x2Ais $2\times 16 + 10 = 42$.
You often see the hexadecimal system used when representing colors, memory addresses, or other binary data in a more readable format.
You might know that 0xFFFFFF is the color white in RGB (255,255,255). This is because each pair of digits represents one color channel (red, green, blue) and each pair can have 256 different values (0-255).
You might see these “Hex color codes” in image editing software like Photoshop to select a specific color.
The hexadecimal system works the same way as the decimal system, but with powers of 16 instead of 10.
| Digit | $A$ | $3$ | $F$ | $2$ |
|---|---|---|---|---|
| Place | $16^3=4096$ | $16^2=256$ | $16^1=16$ | $16^0=1$ |
| Value | $10\times 4096$ | $3\times 256$ | $15\times 16$ | $2$ |
Adding these values together ($A (10) \times 4096 + 3 \times 256 + F (15) \times 16 + 2$) gives us the number $41970$.
Now that you know how to represent numbers in binary and hexadecimal, let’s look at how we can use these numbers to perform calculations.
Doing Math in Binary
You might remember how you learned to add, subtract, multiply, and divide in school. E.g.
1
2
3
4
5
        123
    +   496
carry   1
    -------
        619
The computer does the same thing, but in binary. Here’s how you add two binary numbers:
So whenever you write code like this:
1
2
3
int a = 10;
int b = 20;
int c = a + b;
… the computer is actually doing binary math behind the scenes.
Subtraction uses the same principle, but with a bit more complexity.
If you want to know more about binary math, especially how negative numbers are represented, check out the Two’s Complement system. It is the most common way to represent negative numbers in binary which we need for subtraction.
Non-Integer Numbers
So far we’ve only talked about integers (whole numbers). But what about fractions or real numbers?
The first obvious solution is to use a fixed number of bits for the integer part and another fixed number of bits for the fractional part. This is called fixed-point arithmetic.
| Integer part | Fractional part |
|---|---|
| 101 | 011 |
| $2^2 + 2^0$ | $2^{-2} + 2^{-3}$ |
This way you can represent numbers like $5.375$ as $101.011$.
However, this method has some limitations. The range of numbers you can represent is limited by the number of bits you use for the integer and fractional parts. If you need a larger range, you can use floating-point arithmetic.
This is very similar to scientific notation in decimal numbers. E.g. $1.23 \times 10^3$ is $1230$.
For binary numbers it works the same way, but with powers of 2. E.g. $1.01 \times 2^3$ is $8.25$.
So if we want to use 4 Bytes (32 bits) to represent a floating-point number, it might look like this:
| Sign | Exponent | Mantissa |
|---|---|---|
| 1 Bit | 8 Bits | 23 Bits |
| 0 | 1000 0100 | 0100 0100 … |
| + | $132-127= 5$ | 0.265625 |
Similarly to how we always choose the scientific notation to never have a $0$ in front of the decimal point ($0.00123\times 10^{-2}$ becomes $1.23\times 10^{-4}$), we always assume the first bit of the mantissa to be $1$ and leave it out.
The exponent is stored as an offset value. In the example above, the actual exponent is $5$ but we store it as $132$ (which is $5+127$). This way we can represent both positive and negative exponents ($-126$ to $127$ in this case).
See IEEE 754 for more details.
So in the above example, the mantissa is actually $1.0100 0100 …$ which is $1.265625$ but since we always assume the first bit to be $1$, we leave it out.
The final number is $+1.265625 \times 2^{5}=40.5$.
For a shorter 16-bit floating-point number, it might look like this:
You can try the IEEE-754 Floating Point Converter to play around with different floating-point numbers.
One side-effect of using this way to represent numbers is that you might get rounding errors. This is because some numbers can’t be represented exactly in binary, just like how $1/3$ can’t be represented exactly in decimal.
When programming you might encounter this problem when calculating with floating-point numbers:
1
2
3
4
5
float a = 0.1;
float b = 0.2;
float c = a + b;

// c might be 0.30000000000000004 instead of 0.3
Logic
Now that we know how to represent numbers in binary, let’s look at how we can use these numbers to perform logical operations.
In programming we often need to compare values, check if a condition is true, or combine multiple conditions. This is where boolean logic comes into play.
Boolean Algebra
Boolean algebra is a branch of algebra that deals with true/false values (which can conveniently be represented as $1$ and $0$). It is named after the mathematician George Boole.
For example, we might want to check if the value of a sensor is above a certain threshold:
1
2
3
4
int sensorValue = 500;
int threshold = 400;

bool isAboveThreshold = sensorValue > threshold;
now isAboveThreshold will be true (or 1) because the statement 500 > 400 is true. If we now want to check if the value is also below the critical maximum:
1
2
3
int criticalMax = 1000;

bool isBelowCriticalMax = sensorValue < criticalMax;
we can now combine these two conditions or boolean values using logical operators.
Logical Operators
- AND (
&&): Returnstrueif both conditions aretrue. - OR (
||): Returnstrueif at least one condition istrue. - NOT (
!): Returnstrueif the condition isfalse.
1
2
3
4
5
bool isSafe = isAboveThreshold && isBelowCriticalMax;

bool isDangerous = !isSafe;
// or
bool isDangerous = !isAboveThreshold || !isBelowCriticalMax;
This is the basic idea behind all the logic in your programs. You can combine these simple operations to create complex conditions.
Bitwise Operators
Computers can also perform those logical operations on each bit of larger numbers. These are called bitwise operators.
- AND (
&): Compares each bit of two numbers and returns1if both bits are1. - OR (
|): Compares each bit of two numbers and returns1if at least one bit is1. - XOR (
^): Compares each bit of two numbers and returns1if the bits are different. - NOT (
~): Inverts all bits of a number.
1
2
3
4
5
6
7
int a = 0b1010; // 10
int b = 0b1100; // 12

int andResult = a & b; // 0b1000 = 8
int orResult = a | b;  // 0b1110 = 14
int xorResult = a ^ b; // 0b0110 = 6
int notResult = ~a;    // 0b0101 = -11
These bitwise operations are often used when you need to set or clear specific bits in a number.
These operations are usually displayed by using Truth-Tables:
AND
| A | B | A & B |
|---|---|---|
| 0 | 0 | 0 |
| 0 | 1 | 0 |
| 1 | 0 | 0 |
| 1 | 1 | 1 |
OR
| A | B | A | B |
|---|---|---|
| 0 | 0 | 0 |
| 0 | 1 | 1 |
| 1 | 0 | 1 |
| 1 | 1 | 1 |
XOR
| A | B | A ^ B |
|---|---|---|
| 0 | 0 | 0 |
| 0 | 1 | 1 |
| 1 | 0 | 1 |
| 1 | 1 | 0 |
NOT
| A | ~A |
|---|---|
| 0 | 1 |
| 1 | 0 |
You can also write your own truth-tables for more complex operations.
Representing other Data
So far we’ve only talked about numbers, but what about text, colors, or other data?
Text
Text is usually represented using the ASCII (American Standard Code for Information Interchange) table. This table assigns a number to each character.

For example if you write the text “Hello World!” in a text file, the computer will actually store the following numbers:
| Character | Hexadecimal | Binary |
|---|---|---|
| H | 0x48 | 0100 1000 |
| e | 0x65 | 0110 0101 |
| l | 0x6C | 0110 1100 |
| l | 0x6C | 0110 1100 |
| o | 0x6F | 0110 1111 |
| [SPACE] | 0x20 | 0010 0000 |
| W | 0x57 | 0101 0111 |
| o | 0x6F | 0110 1111 |
| r | 0x72 | 0111 0010 |
| l | 0x6C | 0110 1100 |
| d | 0x64 | 0110 0100 |
| ! | 0x21 | 0010 0001 |
| [NULL] | 0x00 | 0000 0000 |
The ASCII table only uses 7 bits, so the first bit is always 0. This is why the numbers are all below $128$.
It is important to know that the text character/symbol ‘0’ is not the same as the ASCII value $0$. The character ‘0’ actually has the value $48$ or
0x30in the ASCII table.
The last byte of a text string is often a NULL byte (0x00) to indicate the end of the string.
In modern applications, the ASCII table is often extended to include more characters (like emojis) and is called Unicode.
Unicode can use more than a single byte to represent a character. For example, the character ‘👋’ is represented by the Unicode value U+1F44B.
Colors
Colors are usually represented using the RGB (Red, Green, Blue) system. Each color channel can have a value between $0$ and $255$.
For example, the color white is represented as $(255,255,255)$ which is 0x FF FF FF in hexadecimal.
So for 8-bit color channels, you can represent $256^3=16,777,216$ different colors using only 3 bytes (24 bits).
By chaining multiple RGB values together you can represent images. This is how your computer screen works. It stores 3 bytes for each pixel (one for each color channel) and then displays them on the screen.
C++ Basics
Now that we know how a computer represents data, let’s look at how we can write code in the C++ programming language to work with this data.
Variables
Variables are used to store data in a program. You can think of them as named containers for values.
1
2
int a = 10;
int b = 20;
In this example, we create two variables called a and b and assign the values 10 and 20 to them.
The syntax for creating a variable is:
1
type name = value;
Where type is the data type of the variable, name is the name of the variable, and value is the initial value of the variable.
You can also create variables without assigning a value:
1
int a;
… but this is usually not recommended because the value of the variable is undefined (not guaranteed to be 0).
Note how
=is used to assign a value to a variable. This is different from the==operator which is used to compare values.
You declare variables once (specify the type and name) and initialize them (assign a value) when you first use them. Later you can use the variable name to access or change the value:
1
2
3
4
5
int a = 10;
int b = 20;
int c;

c = a + b;
Data Types
Now that you know how to create variables, let’s look at the different data types available in C++.
Integers
| Type | Description | Size (Bytes) | Size (Bits) | Range |
|---|---|---|---|---|
char |
Character or 8-bit integer | 1 | 8 | $-128$ to $127$ |
unsigned char |
positive character or 8-bit integer | 1 | 8 | $0$ to $255$ |
short |
16-bit integer | 2 | 16 | $-32,768$ to $32,767$ |
unsigned short |
positive 16-bit integer | 2 | 16 | $0$ to $65,535$ |
int |
16/32-bit integer (depends on CPU) | 2/4 | 16/32 | $-32,768$ to $32,767$ or $-2,147,483,648$ to $2,147,483,647$ |
unsigned int |
positive 16/32-bit integer | 2/4 | 16/32 | $0$ to $65,535$ or $0$ to $4,294,967,295$ |
long |
32-bit integer | 4 | 32 | $-2,147,483,648$ to $2,147,483,647$ |
unsigned long |
positive 32-bit integer | 4 | 32 | $0$ to $4,294,967,295$ |
long long |
64-bit integer | 8 | 64 | $-9,223,372,036,854,775,808$ to $9,223,372,036,854,775,807$ |
unsigned long long |
positive 64-bit integer | 8 | 64 | $0$ to $18,446,744,073,709,551,615$ |
As you can see, the size of the data types depends on the CPU architecture.
You might have to google the exact size of the data types for your specific platform.
It is also hard to remember all the different sizes of the data types, that’s why I recommend using the stdint data types instead.
The
stdintdata types are part of the C standard library and are guaranteed to have a specific size.
| Type | Size (Bytes) | Size (Bits) | Range |
|---|---|---|---|
int8_t |
1 | 8 | $-128$ to $127$ |
uint8_t |
1 | 8 | $0$ to $255$ |
int16_t |
2 | 16 | $-32,768$ to $32,767$ |
uint16_t |
2 | 16 | $0$ to $65,535$ |
int32_t |
4 | 32 | $-2,147,483,648$ to $2,147,483,647$ |
uint32_t |
4 | 32 | $0$ to $4,294,967,295$ |
int64_t |
8 | 64 | … |
uint64_t |
8 | 64 | … |
I usually only use these data types because they are easier to remember and are guaranteed to have a specific size.
Example:
1
2
3
4
5
6
uint8_t a = 10;
int16_t b = -1000;
int32_t c = b + a;

uint32_t myBinaryValue = 0b1010;
uint32_t myHexValue = 0x2A;
It doesn’t matter if you assign a decimal, binary, or hexadecimal value literal to a variable. The value is always stored in binary.
The char data type is a special integer type that is used to store characters. It is usually 1 byte long and can store values between $-128$ and $127$.
1
2
char myChar = 'A';
char myChar2 = 65; // 'A'
Note that you can use
'A'or65to represent the character ‘A’. SomyCharandmyChar2are the same. This is because the ASCII value of ‘A’ is $65$ (in decimal).
Floating Point
| Type | Description | Size (Bytes) | Size (Bits) | Range |
|---|---|---|---|---|
float |
Single precision | 4 | 32 | $1.175494351 \times 10^{-38}$ to $3.402823466 \times 10^{38}$ |
double |
Double precision | 8 | 64 | $2.2250738585072014 \times 10^{-308}$ to $1.7976931348623157 \times 10^{308}$ |
There is also a long double with 10 bytes but I have never seen it being used.
Example:
1
2
3
float a = 1.23f;
double b = 3.14;
double c = a * b;
Note that the
fat the end of the number is used to indicate that it is afloatliteral. Otherwise you would assign adoublevalue to afloatvariable which might cause a warning.
Boolean
The bool data type is used to store boolean values (true or false).
1
bool myCondition = true;
The size of the bool data type is usually 1 byte, but that’s not guaranteed.
Example:
1
2
3
4
5
6
7
int64_t sensorValue = 500;
int64_t threshold = 400;
int64_t criticalMax = 1000;

bool isAboveThreshold = sensorValue > threshold;
bool isBelowCriticalMax = sensorValue < criticalMax;
bool isSafe = isAboveThreshold && isBelowCriticalMax;
Pointers
Pointers are variables that store a memory address. They are used to indirectly access the value of a variable.
1
2
int a = 10;
int* pointerToA = &a; // pointerToA now stores the memory address of a e.g. 0x12345678
As you can see, the * after the variable is used to declare a pointer variable and the & is used to get the memory address of a variable.
You can also use the * before the variable name to access or dereference the value at the memory address stored in the pointer:
1
int b = *pointerToA; // b now stores the value of a (10)
If we modify the value at the memory address stored in the pointer, the value of the original variable will also change:
1
2
3
int a = 10;
int* pointerToA = &a; // pointerToA now stores the memory address of a
*pointerToA = 20; // a now stores 20
Arrays
Arrays are used to store multiple values of the same data type in a single variable.
Imagine you have a list of sensor values. You wouldn’t want to declare a separate variable for each value, so you can use an array:
1
int sensorValues[10] = {10, 20, 30, 40, 50, 60, 70, 80, 90, 100};
You can then access the individual values using an index starting at 0 for the first element and n-1 for the last element:
1
2
int firstValue = sensorValues[0]; // 10
int lastValue = sensorValues[9]; // 100
You can also provide a variable as an index:
1
2
int index = 5;
int value = sensorValues[index]; // 60
An array is actually just a pointer to the first element of the array. So
sensorValuesis the same as&sensorValues[0].So accessing an element in an array is actually the same as dereferencing a pointer:
and since we can swap the
sensorValuesandindexin the last example because addition is kommutative, we could (but probably shouldn’t) write:
Strings
Arrays are also used to store text (strings) in C++. A string is actually an array of characters:
1
char myString[] = {'H', 'e', 'l', 'l', 'o', ' ', 'W', 'o', 'r', 'l', 'd', '!', '\0'};
which is more commonly written as…
1
const char* myString = "Hello World!";
with const because the string literal "Hello World!" is defined at the time of writing the code and can’t be changed while executing the code.
Note that
'.'is used for single characters and"..."is used for strings.So writing
'Hello'would be an error because'Hello'is not a single character.
Again, you can access the individual characters using an index:
1
2
3
char firstChar = myString[0]; // 'H'
char lastChar = myString[11]; // '!'
char lastChar2 = *(myString+11); // '!'
Operators
Operators are used to perform operations on variables and values.
You have already seen some operators like = (assignment), + (addition), * (multiplication), && (logical AND), etc. in the examples above.
Here is a list of some common operators:
Assignment Operator
The assignment operator = is used to assign a value to a variable.
1
2
int a = 10;
int b = a;
The operator takes whatever the result of the right-hand side expression is and stores it in the variable on the left-hand side.
Arithmetic Operators
| Operator | Description | Example |
|---|---|---|
+ |
Addition | a + b |
- |
Subtraction | a - b |
* |
Multiplication | a * b |
/ |
Division | a / b |
% |
Modulo (Remainder after Division) | a % b |
The results of these operations depend on the data types of the variables involved.
Example:
1
2
3
4
5
6
7
8
int a = 10;
int b = 3;
int c = a / b; // 3
float cf = a / b; // 3.0 because a and b are integers

float d = 10.0f;
float e = 3.0f;
float f = d / e; // 3.333333...f
Comparison Operators
| Operator | Description | Example |
|---|---|---|
== |
Equal to | a == b |
!= |
Not equal to | a != b |
> |
Greater than | a > b |
< |
Less than | a < b |
>= |
Greater than or equal | a >= b |
<= |
Less than or equal | a <= b |
These operators return a boolean value (true or false).
Example:
1
2
3
int a = 10;
int b = 20;
bool aIsGreater = a > b; // false
Logical Operators
| Operator | Description | Example |
|---|---|---|
&& |
Logical AND | a && b |
| || | Logical OR | a || b |
! |
Logical NOT | !a |
^ |
Logical XOR | a ^ b |
Bitwise Operators
| Operator | Description | Example |
|---|---|---|
~ |
Bitwise NOT | ~a |
& |
Bitwise AND | a & b |
| | | Bitwise OR | a | b |
^ |
Bitwise XOR | a ^ b |
<< |
Left Shift | a << 1 |
>> |
Right Shift | a >> 1 |
The << and >> operators shift the bits of a number to the left or right.
Example:
1
2
3
4
5
6
7
8
9
10
int a = 0b1010; // 10
int b = 0b1100; // 12

int andResult = a & b; // 0b1000 = 8
int orResult = a | b;  // 0b1110 = 14
int xorResult = a ^ b; // 0b0110 = 6
int notResult = ~a;    // 0b0101 = -11

int leftShiftResult = a << 1; // 0b10100 = 20
int rightShiftResult = a >> 1; // 0b0101 = 5
Compound Assignment Operators
| Operator | Description | Example |
|---|---|---|
+= |
Add and assign | a += b is the same as a = a + b |
-= |
Subtract and assign | a -= b is the same as a = a - b |
*= |
Multiply and assign | a *= b is the same as a = a * b |
/= |
Divide and assign | a /= b is the same as a = a / b |
%= |
Modulo and assign | a %= b is the same as a = a % b |
&= |
Bitwise AND and assign | a &= b is the same as a = a & b |
| |= | Bitwise OR and assign | a |= b is the same as a = a | b |
^= |
Bitwise XOR and assign | a ^= b is the same as a = a ^ b |
<<= |
Left Shift and assign | a <<= 1 is the same as a = a << 1 |
>>= |
Right Shift and assign | a >>= 1 is the same as a = a >> 1 |
++ |
Increment | a++ is the same as a += 1 or a = a + 1 |
-- |
Decrement | a-- is the same as a -= 1 or a = a - 1 |
These operators are used to combine an operation with an assignment.
Example:
1
2
3
int a = 10;
a += 5; // a is now 15
a++; // a is now 16
Note that
a++is called the post-increment operator because it increments the value ofaafter using it. If you want to increment the value ofabefore using it, you can use the pre-increment operator++a.
The same applies to the post-decrement operator
a--and the pre-decrement operator--a.
Code Structure
Now that you know how to create variables and store data, let’s look at how you can structure your code.
Code Blocks
The most basic building block of a C++ program is the code block. A code block is a group of statements enclosed in curly braces {} that are executed together from top to bottom.
1
2
3
4
5
{
    int a = 10;
    int b = 20;
    int c = a + b;
}
The variables a, b, and c are only accessible within the code block or scope.
That means you can’t access them outside of the code block.
1
2
3
4
5
a = 12; // Error: a is not defined
{
    int a = 10;
}
a = 12; // Error: a is not defined
You can however access variables that are defined outside of a code block or from within a nested code block:
1
2
3
4
5
6
7
8

{
    int b = 20;
    {
        int a = 10;
        int c = a + b; // c = 30
    }
}
Note how the contents of a code block are indented to the right. This is a common convention to make the code more readable.
There is an ongoing war between developers about how many spaces or tabs to use for indentation.
Branching
Now that we have code blocks to group statements together, we can execute a code block based on a condition.
This is called branching and is done using an if statement:
1
2
3
if (condition is true) {
    execute this code block
}
1
2
3
4
5
6
7
int sensorValue = 500;

if (sensorValue > 400) {
    // This code block is executed if the condition is true
    // e.g. the sensor value is above 400
    // ...
}
We can also add an else block to execute code if the condition is false:
1
2
3
4
5
6
7
8
9
10
11
int sensorValue = 500;

if (sensorValue > 400) {
    // This code block is executed if the condition is true
    // e.g. the sensor value is above 400
    // ...
} else {
    // This code block is executed if the condition is false
    // e.g. the sensor value is below 400
    // ...
}
You can also chain multiple conditions together using else if:
1
2
3
4
5
6
7
8
9
10
11
12
13
14
15
16
int sensorValue = 500;

if (sensorValue > 400) {
    // This code block is executed if the condition is true
    // e.g. the sensor value is above 400
    // ...
} else if (sensorValue > 300) {
    // This code block is executed if the first condition is false
    // and the second condition is true
    // e.g. the sensor value is above 300
    // ...
} else {
    // This code block is executed if all conditions are false
    // e.g. the sensor value is below 300
    // ...
}
You can also use boolean variables as conditions:
1
2
3
4
5
6
7
bool isAboveThreshold = sensorValue > 400;

if (isAboveThreshold) {
    // This code block is executed if the condition is true
    // e.g. the sensor value is above 400
    // ...
}
You can also use logical operators to combine multiple conditions:
1
2
3
4
5
6
7
8
9
10
11
12
int sensorValue = 500;
int threshold = 400;
int criticalMax = 1000;

bool isAboveThreshold = sensorValue > threshold;
bool isBelowCriticalMax = sensorValue < criticalMax;

if (isAboveThreshold && isBelowCriticalMax) {
    // This code block is executed if both conditions are true
    // e.g. the sensor value is above 400 and below 1000
    // ...
}
The most advanced form of branching is the switch statement:
1
2
3
4
5
6
7
8
9
10
11
12
13
14
15
16
17

int sensorValue = 500;

switch (sensorValue) {
    case 400:
        // This code block is executed if sensorValue is 400
        // ...
        break;
    case 500:
        // This code block is executed if sensorValue is 500
        // ...
        break;
    default:
        // This code block is executed if sensorValue is not 400 or 500
        // ...
        break;
}
Note that each
caseblock must end with abreakstatement to prevent the code from falling through to the next case.You could omit the
breakstatement to execute multiple cases.The
defaultcase is executed if none of the other cases match.Also note that the
switchstatement only works with integer values in C++.
Loops
Another way to structure your code is to use loops. Loops are used to execute a code block multiple times.
The simplest loop is the while loop:
1
2
3
while (condition is true) {
    execute this code block
}
1
2
3
4
5
6
7
8
int i = 0;

while (i < 10) {
    // This code block is executed as long
    // as the condition (i < 10) is true
    // ...
    i++;
}
The contents of the loop are executed as long as the condition is true. In this case, the loop will execute 10 times.
Another form of the while loop is the do-while loop:
1
2
3
do {
    execute this code block
} while (condition is true)
1
2
3
4
5
6
7
8
int i = 0;

do {
    // This code block is executed at least once
    // and then as long as the condition (i < 1) is true
    // ...
    i++;
} while (i < 1);
The do-while loop is useful when you want to execute the code block at least once since the condition is checked at the end of each iteration.
In this case the loop will execute only 1 time, since i is incremented to 1 before the condition is checked.
In the previous examples we used a counter variable i to keep track of how many times the loop has executed.
This is a common pattern when using loops and there is a shorthand for this called the for loop:
1
2
3
for (initialize counter; condition; update counter) {
    execute this code block
}
1
2
3
4
5
for (int i = 0; i < 10; i++) {
    // This code block is executed as long
    // as the condition (i < 10) is true
    // ...
}
which is equivalent to:
1
2
3
4
5
6
7
int i = 0;
while (i < 10) {
    // This code block is executed as long
    // as the condition (i < 10) is true
    // ...
    i++;
}
A for loop is usually used when you know how many times you want to execute the loop.
You can also use the break statement to exit a loop early:
1
2
3
4
5
6

for (int i = 0; i < 10; i++) {
    if (i == 5) {
        break; // exit the loop early
    }
}
for loops can be used to iterate over the elements of an array:
1
2
3
4
5
6
7
8
9
int sensorValues[10] = {10, 20, 30, 40, 50, 60, 70, 80, 90, 100};

int sum = 0;

for (int i = 0; i < 10; i++) {
    sum += sensorValues[i];
}

int average = sum / 10;
This loop will calculate the sum of all the elements in the sensorValues array.
Functions
When you have a block of code that you want to reuse, you can give it a name to create a function.
Functions also usually return a value to the caller e.g. the code that called the function.
They also my accept input parameters to allow the caller to pass data to the function.
1
2
3
4
return_type function_name(parameter_type parameter_name, ...) {
    execute this code block
    return value;
}
1
2
3
int add(int a, int b) {
    return a + b;
}
This function takes two integer parameters a and b and returns their sum.
You can then call the function like this:
1
int result = add(10, 20); // result is 30
We can also do more complex calculations in a function:
1
2
3
4
5
6
7
8
9
int average(int* values, int count) {
    int sum = 0;

    for (int i = 0; i < count; i++) {
        sum += values[i];
    }

    return sum / count;
}
1
2
3
int sensorValues[10] = {10, 20, 30, 40, 50, 60, 70, 80, 90, 100};

int avg = average(sensorValues, 10);
Note how we give the
averagefunction the address (pointer) to the first element of thesensorValuesarray.We also need to tell the
averagefunction how many elements are in the array so it knows when to stop, since a pointer or array doesn’t know its own size.
Functions might also just do something without returning a value:
1
2
3
4
void doSomething() {
    // This function does something but doesn't return a value
    // ...
}
In this case the special void return type is used to indicate that the function doesn’t return a value.
Compound Data Types
Sometimes you want to group multiple variables together to create a new data type. For example you might want to store the position of multiple points in 3D space.
instead of using three separate double arrays for the x, y, and z coordinates:
1
2
3
double x[10] = {1.0, 2.0, 3.0, 4.0, 5.0, 6.0, 7.0, 8.0, 9.0, 10.0};
double y[10] = {1.0, 2.0, 3.0, 4.0, 5.0, 6.0, 7.0, 8.0, 9.0, 10.0};
double z[10] = {1.0, 2.0, 3.0, 4.0, 5.0, 6.0, 7.0, 8.0, 9.0, 10.0};
… you can create a new data type called a struct:
1
2
3
4
5
struct Point {
    double x;
    double y;
    double z;
};
Not that the curly braces
{}are used to start and end the struct definition. It is not a code block that is executed.
Now you can create variables and arrays of the Point type:
1
2
3
4
5
6
7
8
9
10
11
12
13

Point points[10] = {
    {1.0, 1.0, 1.0},
    {2.0, 2.0, 2.0},
    {3.0, 3.0, 3.0},
    {4.0, 4.0, 4.0},
    {5.0, 5.0, 5.0},
    {6.0, 6.0, 6.0},
    {7.0, 7.0, 7.0},
    {8.0, 8.0, 8.0},
    {9.0, 9.0, 9.0},
    {10.0, 10.0, 10.0}
};
You can then access the individual fields of the Point struct using the . operator:
1
2
3
4
Point p = points[0];
double x = p.x; // 1.0
double y = p.y; // 1.0
double z = p.z; // 1.0
You can also use structs inside structs:
1
2
3
4
5
6
7
8
9
10
11
12
13
14
struct Position {
    int x;
    int y;
}

struct Size {
    int width;
    int height;
}

struct Rectangle {
    Position position;
    Size size;
}
You can also override or overload functions and even operators for structs.
For example you can define that a
Position + Sizeoperation returns aRectangle.
Now you can write the following code:
You can also add functions to a struct.
1
2
3
4
5
6
7
8
struct Rectangle {
    Position position;
    Size size;

    int area() {
        return size.width * size.height;
    }
}
Now you can call the area function on a Rectangle:
1
2
Rectangle r = { {10, 20}, {100, 200} };
int a = r.area(); // 20000
Note that the curly braces
{}around the initialization values are not code blocks but are used to initialize the struct fields.
Structs are a powerful way to group related data together and create new data types. They are technically not C++ specific and are also available in C.
C++ also has more advanced “structs” called classes which are used to create objects.
1
2
3
4
5
6
7
8
9
class Rectangle {
public:
    Position position;
    Size size;

    int area() {
        return size.width * size.height;
    }
}
Classes are a more advanced topic and are used to create object-oriented programs.
Using pre-written code (Libraries)
When you write a program you often need to use code that someone else has written. This is where libraries come in.
In other programming languages like Python or JavaScript, you can just import a library and start using it.
In C++ you have to include the header file of the library to use it.
A header file is a file that contains the declarations of the functions and variables in the library.
You can include a header file using the #include directive:
1
#include <library_name.h>
This will literally copy and paste the contents of the header file into your code. This is why header files are also called include files.
Header files are special because they usually only contain declarations and not definitions or implementations.
1
int add(int a, int b); // declaration without implementation
This tells the compiler that there is a function called add that takes two integer parameters and returns an integer.
And the linker later has to find the definition of the function in the library.
The standard library
The C++ standard library is a collection of header files that are included with every C++ compiler.
You can use the functions and classes in the standard library by including the appropriate header file.
For example if you want to use the stdint data types you have to include the cstdint header file:
1
2
3
4
#include <cstdint>

int8_t a = 10;
int16_t b = 20;
You can find everything about the C++ standard library in the C++ reference.
From C++ to Machine Code
C++ is a high-level programming language which means that it is not directly read and executed by the CPU but needs to be translated or compiled into machine code.
High-level programming languages are designed to be easy to read and write for humans, while low-level programming languages are designed to be easy to read and write for machines.
What does the CPU actually understand?
The CPU only understands machine code which is a sequence of binary instructions that tell the CPU what to do.
This set of instructions is usually relatively simple and consists of operations like add, subtract, multiply, divide, load, store, jump, compare, etc.
Machine code doesn’t have named variables or functions, it only has memory addresses and registers.
The CPU has a limited number of registers which are used to store temporary values during calculations.
It is the compiler’s job to translate the high-level C++ code into machine code that the CPU can execute.
For C++ this process looks something like this:
graph LR
    subgraph Preprocessor
        S_A[myApp.cpp #include libraryA.h]
        S_B[libraryA.cpp #include libraryB.h]
        S_C[libraryB.cpp]
    end
    subgraph Compiler
        S_A-->C_A[myApp.o]
        S_B-->C_B[libraryA.o]
        S_C-->C_C[libraryB.o]
    end
    subgraph Linker
        L_A[myApp.exe]
    end
    C_A --> L_A
    C_B --> L_A
    C_C --> L_A
- Preprocessor: The preprocessor reads the source code and processes the
#includedirectives to include the header files. - Compiler: The compiler translates the C++ code into object files (
.oor.obj) which contain the machine code for the functions and variables in the source code.- In this example
myApp.cpponly knows which functions exist inlibraryA.hbut not what code they execute. So the compiler assumes they will later be linked in from thelibraryA.oobject file.
- In this example
- Linker: The linker takes all the object files and links them together to create the final executable file (
.exe).- If the linker can’t find a function that is declared in a header file it will throw a linker error.
Linker Errors are often caused by forgetting to include a library or forgetting to implement a function that is declared in a header file.
They can be very annoying to debug because the error message usually doesn’t tell you what went wrong.
That is why it is important to know how the compiler and linker work so you can understand what is going on.
Back to Arduino
Now that you know the basics of C++ programming, let’s look at how you can use this knowledge to write code for an Arduino.
What is an Arduino?
An Arduino is a small microcontroller board that you can use to build all kinds of electronic projects.
 Arduino Uno Rev3 Board
It is basically a small computer that can run programs written in C++ and interact with the physical world using sensors, motors, lights, etc.
It has a CPU (Central Processing Unit) that runs the program you write (the big black rectangle in the middle of the board), which is connected to general purpose input/output GPIO pins (the black bars with holes at the top and bottom), that you can use to connect sensors, motors, etc. using wires.
Which pin does what is usually written on the board itself but you can always find this information for any board/chip by searching for a pinout diagram or looking at the datasheet.
Here is the pinout diagram for the Arduino Uno Rev3:
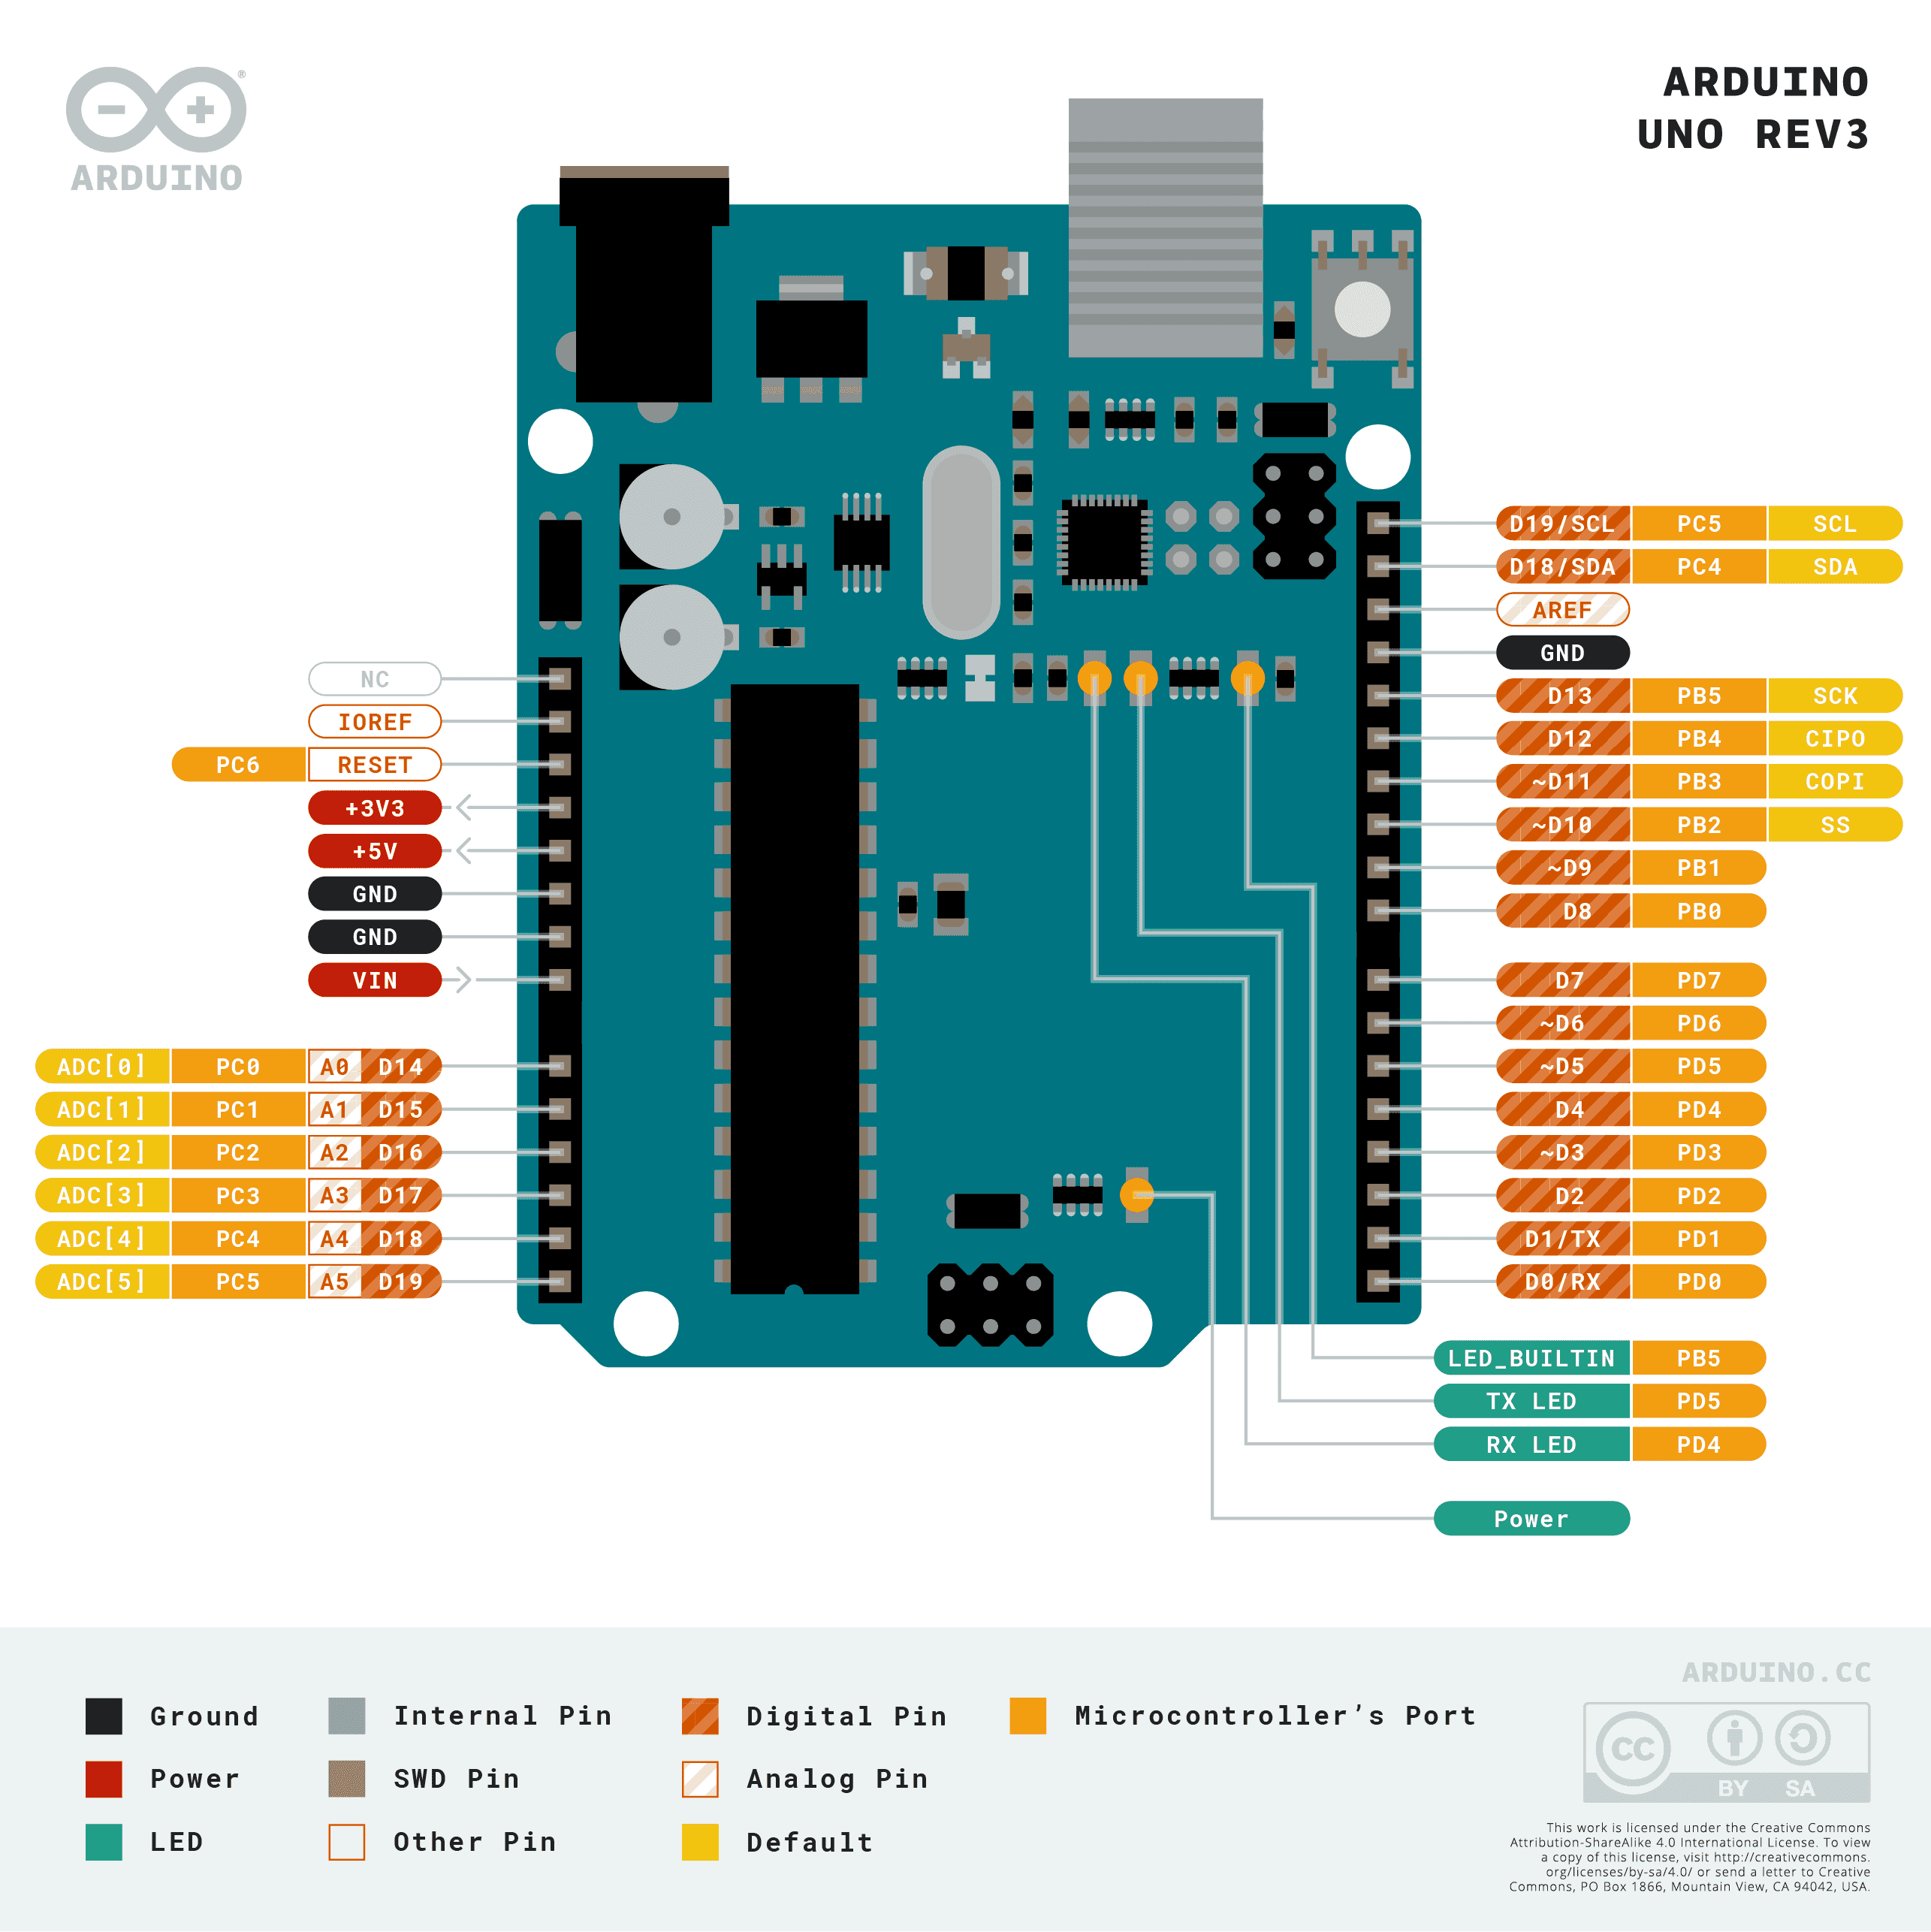 Arduino Uno Rev3 Pinout
Arduino IDE
Writing code for an Arduino is very similar to writing code for a computer.
The main difference is that you don’t use a “normal” compiler to compile the code since this would produce machine code for your computer’s CPU and not the Arduino’s CPU.
The Arduino IDE (Integrated Development Environment) is a special program that includes a compiler and uploader for the Arduino.
You can write your code in the Arduino IDE, click the upload button, and the IDE will compile your code and upload it to the Arduino.
You can install the Arduino IDE from the official website.
Or if you are on windows you can use winget to install it:
1
2
3
4
5
6
7
8
C:\Users\MindStudio> winget search Arduino
Name                                ID                   Version     Übereinstimmung Quelle
--------------------------------------------------------------------------------------------
Arduino CLI                         ArduinoSA.CLI        1.2.0       Tag: arduino    winget
Arduino IDE RC                      ArduinoSA.IDE.rc     2.0.0-rc9.3 Tag: arduino    winget
Arduino IDE                         ArduinoSA.IDE.stable 2.3.4       Tag: arduino    winget
AVR-GCC                             ZakKemble.avr-gcc    14.1.0      Tag: arduino    winget
Arduino IDE Beta                    ArduinoSA.IDE.beta   2.0.0.0                     winget
Simply type winget install ArduinoSA.IDE.stable into CMD to install the stable version of the Arduino IDE.
After installing the Arduino IDE you can open it and start writing code.
If you already have an Arduino Board you can connect it to your computer using a USB cable and select the correct port and board in the Arduino IDE.
Read more about the Arduino IDE in the official documentation.
Arduino Code Structure
An Arduino project is called a sketch and consists of two main functions:
1
2
3
4
5
6
7
8
9
void setup() {
    // This code is executed once when the Arduino is powered on or reset
    // ...
}

void loop() {
    // This code is executed repeatedly as long as the Arduino is powered on
    // ...
}
These are functions that return void (nothing, they just do stuff) and take no parameters.
When you upload your code to the Arduino, the setup function is executed once and then the loop function is executed repeatedly until you turn off or reset the Arduino.
The setup function is used to initialize the Arduino and set up the pins, sensors, etc.
The loop function is used to run the main program logic and interact with the physical world.
Arduino pre-defined Code
The Arduino IDE includes a lot of pre-written code that you can use to interact with the physical world.
You wouldn’t want to write this code yourself because it is very low-level and complex.
If you are not using the Arduino IDE you would need to include the Arduino.h header file to use these functions. But the Arduino IDE does this for you automatically.
Here is an overview of all the functions you can use in an Arduino sketch:
or open the Arduino Language Reference in your browser.
Arduino Blinking LED Example
Let’s write a simple program that blinks an LED connected to pin 13 on the Arduino.
For this we need to change tho voltage on pin 13 from HIGH to LOW and back to HIGH every second.
You can read more about digital pins, pin modes, and digital I/O at Arduino/Microcontrollers/Digital-Pins.
In the first section of the language reference Digital I/O you can find functions to read and write digital pins.
First we need to set the pin mode to OUTPUT using the pinMode() function:
1
2
3
void setup() {
    pinMode(13, OUTPUT);
}
We only need to do this once. That’s why we put it in the setup function.
If you want to know why we need to set the pinMode read the article about Digital-Pins above.
Then we can write the code to blink the LED by using the digitalWrite() function:
1
2
3
4
void loop() {
    digitalWrite(13, HIGH); // turn the LED on
    digitalWrite(13, LOW); // turn the LED off
}
We want to repeat this process. That’s why we put it in the loop function.
This now looks like this:
If you press the green Run button you can see the LED looks like it is always on.
This is because the loop function is executed so fast that you can’t see the LED turning on and off.
To make the LED blink every second we can use the delay() function:
1
2
3
4
5
6
void loop() {
    digitalWrite(13, HIGH); // turn the LED on
    delay(1000); // wait for 1000 milliseconds (1 second)
    digitalWrite(13, LOW); // turn the LED off
    delay(1000); // wait for 1000 milliseconds (1 second)
}
Now the LED should blink every second:
As you can see, the LED behaves as expected.
I also added a current-limiting resistor to the circuit to prevent the LED from burning out.
A red LED usually has a forward voltage of around 2V and a forward current of around 20mA.
The Arduino provides a voltage of 5V on the digital pins so we need to limit the current to 20mA using Ohm’s Law:
\[R=\frac{U}{I}=\frac{5V}{20mA}=250\Omega\]So a more common $220\Omega$ resistor should be fine.
Arduino Serial Communication
Another important feature of the Arduino is the ability to communicate with a computer or other devices using the serial port.
The Serial Monitor is a tool in the Arduino IDE that allows you to send and receive data from the Arduino over the USB cable.
You can use the Serial library to send and receive data over the serial port.
A serial communication consists of sending and receiving bytes of data in series.
The signal transmitted over the serial port is a binary signal that represents the ASCII value of the character and might look something like this:

The Ups and Downs represent the 1s and 0s of the binary signal.
Chaining these 1s and 0s together gives you the byte that is transmitted.
You can then use ASCII to convert the byte to a character.
The length of a single 1 or 0 is called a baud and is usually 9600 baud. That means that the signal carries 9600 bits per second.
A more modern baud rate is 115200 baud or 115.2 kbps.
Both the sender and receiver need to use the same baud rate to communicate. Otherwise they won’t know where a bit starts and ends.
You can use the Serial.begin() function to set the baud rate:
1
2
3
void setup() {
    Serial.begin(115200);
}
You can then use the Serial.print() and Serial.println() functions to send data over the serial port:
1
2
3
4
void loop() {
    Serial.println("Hello World!");
    delay(1000);
}
This will send the string “Hello World!” over the serial port every second.
Now after uploading the code you can open the Serial Monitor in the Arduino IDE. You need to select the correct baud rate to see the output.
1
2
3
4
5
Hello World!
Hello World!
Hello World!
Hello World!
...
Back to the Main Example
Now you should have all the knowledge you need to understand the code in the main example. Or at least know where to look for more information.
Let’s go through the code step by step:
1
2
3
4
5
6
7
8
9
10
11
12
13
14
15
16
17
18
19
20
21
22
23
24
25
26
27
28
29
30
31
32
33
34
#define START_LED 2
#define LED_COUNT 8

uint8_t count = 0;

void setup() {
  Serial.begin(115200);

  for (uint8_t led = START_LED; led < LED_COUNT + START_LED; led++) {
    pinMode(led, OUTPUT);
  }
}

void loop() {
  setLEDsToCount();
  Serial.print("DEC: ");
  Serial.print(count,DEC);
  Serial.print(" BIN: 0b");
  Serial.print(count,BIN);
  Serial.print(" HEX: 0x");
  Serial.println(count,HEX);
  delay(1000);
  count++;
}

void setLEDsToCount() {
  for (uint8_t led = START_LED; led < LED_COUNT + START_LED; led++) {
    if ((count >> led - START_LED) & 0x1) {
      digitalWrite(led, HIGH);
    } else {
      digitalWrite(led, LOW);
    }
  }
}
- Line 1/2:
#define: The#definedirective is used to define constants that can be used throughout the code. In this case we define theSTART_LEDandLED_COUNTconstants to make the code more readable.- these #defines are later replaced by the preprocessor with the actual values.
- Line 4: Here we define a global variable
countthat is used to keep track of the current count. - The
setup()function is used to initialize the Arduino and set up the pins for the LEDs.- We use
Serial.begin(115200)to set up the serial communication with a baud rate of 115200. - We then use a
forloop to set the pins of the LEDs toOUTPUT.
- We use
- The
loop()function is used to run the main program logic.- We call the
setLEDsToCount()function to set the LEDs to the current count. - Then we use the
Serial.print()andSerial.println()functions to send the count in decimal, binary, and hexadecimal to the serial port:DEC: 255 BIN: 0b11111111 HEX: 0xFF. - We then increment the count and wait for 1 second.
- We call the
- The
setLEDsToCount()function is used to set the LEDs to the current count.- We use a
forloop to iterate over the LEDs and set them toHIGHorLOWbased on the current bit of the count.- To find the current bit we use the bitwise shift operator
>>to shift the count to the right by the number of the current LED minus theSTART_LED. - We then use the bitwise AND operator
&to check if the rightmost bit is1. - If it is we set the LED to
HIGH, otherwise we set it toLOW.
- To find the current bit we use the bitwise shift operator
- We use a
What Next?
Now that you know the basics of C++ programming and how to write code for an Arduino, you can start building your own projects.
For starters, I recommend looking at the different Example Sketches provided in the Arduino IDE to get an idea of what is possible. Try to understand how they work and modify them to suit your needs.
Here are some project ideas to get you started:
- Controlling Servo Motors: Use the
Servolibrary to control servo motors and build a robotic arm. - Reading Sensors: Use the
AnalogReadfunction to read data from sensors like light sensors, temperature sensors, etc. - Building a Thermostat: Use a temperature sensor to control a heater or air conditioner.
- Control Relays: Use relays to control high-voltage devices like lights, fans, etc.
- Use a LCD Display: Use an LCD display to show data like temperature, humidity, etc.
The basics of C++ programming that I provided are just the tip of the iceberg. Basically everything I told you was still only C code and didn’t even touch the C++ features like classes, inheritance, polymorphism, etc.
I recommend taking a look at the C++ reference to learn more about the language.
In a real program you would use more C++ features like the standard library containers std::array, std::vector, std::map, etc. or std::string to manage text that we didn’t talk about in this tutorial.
There are also many nice algorithms and other data structures in the standard library that you can use to make your code more efficient and readable.
I would also recommend looking into ESP32 boards which are more powerful than the Arduino and have built-in WiFi and Bluetooth capabilities while also being compatible with the Arduino IDE.
Important Resources
- C++ Reference - The C++ reference is a great resource to learn more about the C++ language and the standard library.
- C++ Data Types - Learn more about the different data types in C++.
- C++ Containers - A collection of data structures that are part of the C++ standard library.
- C++ Strings - Learn more about the
std::stringclass and how to use it. - C++ Algorithms - Useful algorithms you can use with the standard library containers.
- Arduino Language Reference - Everything about the Arduino programming language and the functions you can use in your sketches.
- Arduino IDE - The official Arduino IDE documentation.
- ESP32 and Arduino Simulator… used in this tutorial for the examples
- Compiler Explorer - A great tool to see the assembly code generated by the compiler for your C++ code. You can also use it to compare different compilers and their optimizations or simply run C++ code in the browser.
Awesome Youtube Videos
- Exploring How Computers Work - Sebastian Lague A great explanation on how computers work at the core from simple logic gates to binary arithmetic.
- Ben Eater’s Youtube Channel Ben Eater has a great series of videos on how computers work on the hardware level and how to build your own computer from scratch.